The following blogs you will see below are photography lessons i made to help the beginners. i have compiled everything that helped me when i was starting years ago. The lessons are very basic and easy to understand (i hope), if you do have questions and want to show your lessons feel free to email me and i will do my best to reply with the most appropriate constructive criticism.
In order to get the best out of the lesson it is best to go about it with someone, so at least you have a friend to shoot with. Also make sure that you do the lessons because it will help you develop your eye for photography and of course keep on shooting so you will know what you want.
Showing posts with label 7 day lesson. Show all posts
Showing posts with label 7 day lesson. Show all posts
Monday, March 12, 2007
Photography lesson day 7 - Aperture
Day 7
Aperture. Playing with aperture can create minimum depth of fields or maximum depth of field, Depth of field means the “the depth of area that is sharp in a photo”. It’s the photographer’s creative call to either sharpen the foreground or the background. Minimum depth of field means a specific area is sharp and the rest of the picture is not too sharp. To create a minimum depth of field you must put the aperture to the biggest opening f.2 or f/2.4, by doing this only the image focused by the photographer will appear sharp and the rest is blurred as long as the subject is far from a background. Minimum depth of field is best used for portraits or on emphasizing a subject and then making the rest blurred.
Maximum depth of field makes all the images in the photo appear sharp. To create a maximum depth of field you must put the setting to the smallest opening such as f/16 or f/32. Maximum depth of field is best used for landscapes or documentary photos.
Minimum depth of field:
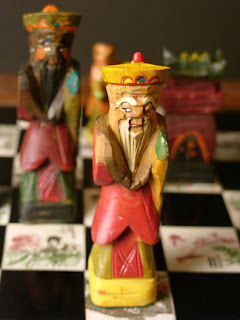
Maximum depth of field:

Assignment G:
1. Shoot a subject using minimum depth of field
2. Shoot a subject using maximum depth of field
Tips: The aperture and shutter speed play a big role in the exposure of the photography; aside from exposure it also affects the depth of field of the picture. Remember to compensate the settings properly. If you want to blur a subject, set the shutter speed to a slow setting and the set the aperture to the recommended exposure setting or if you want a shallow depth of field for your subject. Set the aperture to the biggest opening or smaller number and put your aperture to the recommended exposure setting
Aperture. Playing with aperture can create minimum depth of fields or maximum depth of field, Depth of field means the “the depth of area that is sharp in a photo”. It’s the photographer’s creative call to either sharpen the foreground or the background. Minimum depth of field means a specific area is sharp and the rest of the picture is not too sharp. To create a minimum depth of field you must put the aperture to the biggest opening f.2 or f/2.4, by doing this only the image focused by the photographer will appear sharp and the rest is blurred as long as the subject is far from a background. Minimum depth of field is best used for portraits or on emphasizing a subject and then making the rest blurred.
Maximum depth of field makes all the images in the photo appear sharp. To create a maximum depth of field you must put the setting to the smallest opening such as f/16 or f/32. Maximum depth of field is best used for landscapes or documentary photos.
Minimum depth of field:

Maximum depth of field:

Assignment G:
1. Shoot a subject using minimum depth of field
2. Shoot a subject using maximum depth of field
Tips: The aperture and shutter speed play a big role in the exposure of the photography; aside from exposure it also affects the depth of field of the picture. Remember to compensate the settings properly. If you want to blur a subject, set the shutter speed to a slow setting and the set the aperture to the recommended exposure setting or if you want a shallow depth of field for your subject. Set the aperture to the biggest opening or smaller number and put your aperture to the recommended exposure setting
Photography lesson day 6 - Shutter Speed
DAY 6
Playing with Aperture and Shutter
The difference between a good and an amateur photographer is that an amateur photographer points at a subject and then shoots, a good photographers knows how a camera works and how the final image is affected by the adjustment of shutter speed and aperture therefore a good photographer thinks or visualizes what he wants for a final image before shooting.
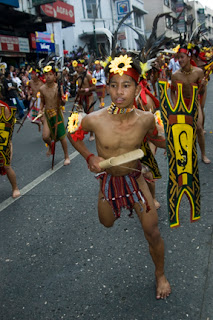
Shutter Speed. You may use a slow shutter to blur the movement of an object. This means that the reading of slow aperture must be compensated by a small opening aperture or higher f/stop. On the other hand a faster shutter speed will freeze the motion. To do this, set first the shutter speed to desired speed and then get the exposure.
This is an example of blurring the motion. I used slow shutter to show the tracks of the drum sticks

This one on the other hand shows a frozen motion. Notice that everything is sharp.
Assignment F:
1. Shoot a moving subject on a slow shutter
2. Shoot a moving object and stop the motion
Playing with Aperture and Shutter
The difference between a good and an amateur photographer is that an amateur photographer points at a subject and then shoots, a good photographers knows how a camera works and how the final image is affected by the adjustment of shutter speed and aperture therefore a good photographer thinks or visualizes what he wants for a final image before shooting.
Shutter Speed. You may use a slow shutter to blur the movement of an object. This means that the reading of slow aperture must be compensated by a small opening aperture or higher f/stop. On the other hand a faster shutter speed will freeze the motion. To do this, set first the shutter speed to desired speed and then get the exposure.
This is an example of blurring the motion. I used slow shutter to show the tracks of the drum sticks

This one on the other hand shows a frozen motion. Notice that everything is sharp.

Assignment F:
1. Shoot a moving subject on a slow shutter
2. Shoot a moving object and stop the motion
Sunday, March 11, 2007
Photography lesson day 5 - Framing
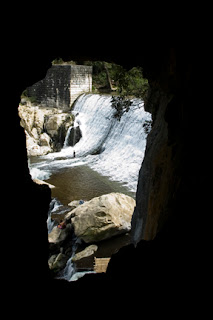
4. Framing simply means frame a picture within a frame. This is something like using an arc of a church door to frame a person. or using a window to frame a subject
In this picture below i used the hole in the cave to frame the water falls
Or you can use a whole area or dominant color to frame your subject
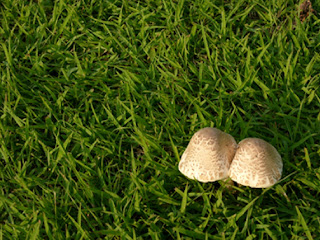
this is an example of using rule of thirds and framing at the same time
Assignment E:
Shoot using framing technique as many as you can
There are other ways to compose a picture. What I mentioned above are just some of the samples. Try experimenting other ways to compose a subject, it is also helpful to look at books or websites on composition. The more you experiment the more you learn.
In this picture below i used the hole in the cave to frame the water falls

Or you can use a whole area or dominant color to frame your subject

this is an example of using rule of thirds and framing at the same time
Assignment E:
Shoot using framing technique as many as you can
There are other ways to compose a picture. What I mentioned above are just some of the samples. Try experimenting other ways to compose a subject, it is also helpful to look at books or websites on composition. The more you experiment the more you learn.
Photography lesson day 4 - Simplify
DAY 4
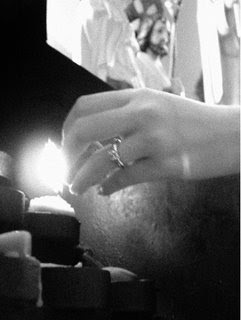
3. Simplify the photo means the photo doesn’t contain elements that distracts the viewers from the subject matter or the only thing sharply focus if the subject. In wide-angle lens try not including bright area the will distract the viewers for the subject or too much action happening behind the subject unless these elements are helpful in making the image stronger.
Notice that the only thing sharp in the picture is the hand and rosary everything else is blurred or another way of doing it is filling the frame with just hand and rosary.

Another way to simplify is to fill your frame with the subject. Notice that the frame is only filled with kids wearing hats.

Assignment D:
Shoot any subject you want using this technique. Make sure to simplify. Shoot as many as you can & explore new ways of simplifying the image
3. Simplify the photo means the photo doesn’t contain elements that distracts the viewers from the subject matter or the only thing sharply focus if the subject. In wide-angle lens try not including bright area the will distract the viewers for the subject or too much action happening behind the subject unless these elements are helpful in making the image stronger.
Notice that the only thing sharp in the picture is the hand and rosary everything else is blurred or another way of doing it is filling the frame with just hand and rosary.

Another way to simplify is to fill your frame with the subject. Notice that the frame is only filled with kids wearing hats.

Assignment D:
Shoot any subject you want using this technique. Make sure to simplify. Shoot as many as you can & explore new ways of simplifying the image
Photography lesson day 3 - Use Lines
DAY 3
2. Use lines. There are several ways to use lines to make a technically good photo. Use lines to lead the eyes of the viewer to the subject.

Using 2 lines to bring the eyes to the river & to the mountain
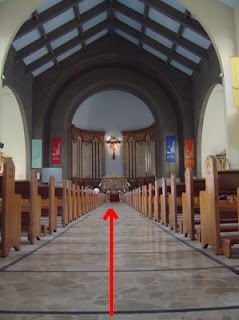
The aisle is like an invisible line it brings your eye towards the altar and the cross. In landscapes you may use C-curves or s-curves shaped rivers to lead the eyes of a viewer, maybe towards a mountain on other subjects.
Assignment C:
Shoot using composition technique of leading lines as many as you can.
2. Use lines. There are several ways to use lines to make a technically good photo. Use lines to lead the eyes of the viewer to the subject.

Using 2 lines to bring the eyes to the river & to the mountain

The aisle is like an invisible line it brings your eye towards the altar and the cross. In landscapes you may use C-curves or s-curves shaped rivers to lead the eyes of a viewer, maybe towards a mountain on other subjects.
Assignment C:
Shoot using composition technique of leading lines as many as you can.
Photography lesson day 2 - Composition & Rule of thirds
Composition in photography
Composition plays a big factor in making a photo look good or not. It is best to know some techniques in composition since most of the advance cameras today have very good automatic shooting modes. My point is that almost any one can shoot but it takes the best photographers to compose a good picture. There are no hard and fast rules in making a beautiful picture, only guidelines that helped artists then and now in making good photos.
1. Rule of thirds simply means not putting the subject in the middle of the frame or putting it off center. Why? Because putting the subject in the middle of the frame makes the picture look boring or static.
Most of the time the tendency of an amateur photographer is to put a subject in the middle of the frame this is because people have been used to the idea of focusing an image in the middle of the frame and then shoot, it is best to focus and then compose. By doing this there is more thought given to the image than just clicking away.
The frame is divided in 3 parts.
putting the picture where the lines
intersect makes the picture more
interesting.

Assignment B:
Shoot as many as you can use rule of thirds as composition technique.
Composition plays a big factor in making a photo look good or not. It is best to know some techniques in composition since most of the advance cameras today have very good automatic shooting modes. My point is that almost any one can shoot but it takes the best photographers to compose a good picture. There are no hard and fast rules in making a beautiful picture, only guidelines that helped artists then and now in making good photos.
1. Rule of thirds simply means not putting the subject in the middle of the frame or putting it off center. Why? Because putting the subject in the middle of the frame makes the picture look boring or static.
Most of the time the tendency of an amateur photographer is to put a subject in the middle of the frame this is because people have been used to the idea of focusing an image in the middle of the frame and then shoot, it is best to focus and then compose. By doing this there is more thought given to the image than just clicking away.
The frame is divided in 3 parts.
putting the picture where the lines
intersect makes the picture more
interesting.

Assignment B:
Shoot as many as you can use rule of thirds as composition technique.

Photography lesson Day 1 - Introduction
Day 1
So you want to be a photographer?
There are different levels of photography, on the leisure class there would be the clicker who would shoot occasionally or when he wants to. There are the serious hobbyists who would go around spending for gadgets and travel just to satisfy their need to capture images. There are the intellectual photographers who are the knowledge eaters, they read and read and read but do not shoot, ask them anything and you get an instant answer. There are the professional photographers who earn their living getting paid to take pictures. They can be wedding photographers, photojournalists or commercial photographers. And there is the artist photographer who just shoots what he likes to shoot for the sake of art. Any of these I mentioned can be you so before even thinking of advancing your way to being called a PHOTOGRAPHER you first need to know the kind of photography you want to do.
In order to know what you want you need to determine your goal, ask yourself “why do I want to learn”? maybe because you want to be a professional photographer or just make it a hobby or just to know. After answering the question ask yourself “What is my interest or what it is that interests me?” is it shooting landscapes? People? Candid moments? Sports? Cars? To know the branch of photography you are interested in it is best to check out newspapers, books and magazines to know the kind of photography that strikes you. A portrait maybe or an advertisement or documentary photo. Only by knowing these things will make you appreciate photography because you know what you want and if you get what you want, then you know you have a new knowledge.
Assignment A:
1. Write down the reasons why you want to learn photography, where are you going to use your knowledge? What kind photographer you want to be, a professional if yes what kind of practice, if no, what is the extent of your hobby? The answers here are important it will tell if you want to be a professional or just a hobbyist
2. get a photo you personally took and write down the reasons why you like it. Take hold of it because you will compare it to you pictures after finishing all the assignments.
3. Get a photo you did not take, something that caught your attention, it maybe from a magazine, newspaper or Internet, anywhere as long as you did not take it and then write down the reasons why you like it. The reason will determine the style you want for your shooting
Practical photography
This is a lesson that will help readers jump-start their way into taking pictures. I made everything easy to read and understand, no camera jargons or technical hullabaloos. I didn’t put a lot of information because I want readers have the freedom of trying and experimenting, by doing so students and readersbecome more creative in their approach to photography.
The main goal of this reading is to elevate the skill of a photographer with the introduction of technical terms and technical skills in photography. And at the same time developing the creativity of the photographer by doing exercises suggested in this manual
These are just the basics and the important foundations for an inspiring photographer. Much of the photographer’s knowledge is gained through shooting and experience. I learned mine through shooting, and shooting a lot of films. To those who want to learn photography it doesn’t just take a click of the camera’s shutter to capture a subject. A subject needs to be treated with a lot of thought and careful study on how to make it appealing as a photograph. Remember that a photograph is never accompanied by words so the message of the photograph has to be clear, if the message is happy baby just make sure that the body language of the baby is happy by showing a smile or laughter.
Learn and enjoy through this simple practical photography guidelines.
Basic Vocabulary:
Camera is a tool used to capture an image to make a photograph.
Lens is a part of the camera where light passes through.
Photograph is an image captured on Film or imaging sensor
Film is where the image is recorded.
Imaging sensor is the “film” of the digital camera.
Film Sensitivity is the measure of film’s sensitivity to light. It is measure in ISO 100, 200, 400, 800 and 1600. Lower the number requires longer exposure, the higher the number the more sensitive to light thus requiring less light to capture the image. Practically, if you don’t have a tripod use a higher sensitivity on low light situation because this will not require longer exposure but quality may suffer because of noise or grain on the photo.
(A noise or grain is like little dust particle on the all over photo.)
Sample of a grainy or noisy photo, the picture looks rough.
Aperture* is the hole or iris in the lens where light passes through. This means that the bigger the hole the more light is allowed to reach the film or digital sensor (for digital camera). The symbol is f, and the following are the openings f/16, f/11, f/8, f/5.6, f/4, f/2.8, f/2, f/1.4. to open up one stop means turning the aperture from f/16 to f/11 (if your setting is on f/16), to open up two stop (if the setting is on f/16) means turning the setting from f/16 to f/8. Remember that the lower the number the bigger the opening of the aperture therefore allowing more light to pass through the hole and the higher the number the less light that comes in
Shutter speed* is the time for which the shutter curtain is held open during the taking of an image to allow light to reach the film or imaging sensor. The longer the shutter is open the more light captured on film. Common shutter speeds are from fast to slow: 1/2000, 1/1000, 1/500, 1/250, 1/125, 1/60, 1/30, 1/15, 1/8, 1/4, 1/2 of a second and 1 second. The symbol B on the shutter speed dial means manually leaving the shutter open until the photographer closes it. Leaving the shutter on setting like 1/2 of a second means more light is recorded on film.
*Check your camera manual on how to or where to adjust
Things to know about your camera Digital or Film
Exposure modes:
1. Manual. This setting will allow you to manipulate the shutter speed and aperture setting giving you more creativity to your image
2. Aperture Priority. This setting allows you to manipulate on the aperture setting making your shutter speed to automatically set its own exposure. You normally use this when you want a shallow or great depth of field (Depth of field or DOF is explained on later lessons)
3. Shutter Priority. This allows you to assign a shutter of your choice and the aperture automatically sets itself as you shoot. You normally use this if you want to have an effect of blurring or freezing motion which I shall explain on later lessons
4. Program mode. This mode allows you to just point and shoot. The camera take care of everything.
ISO setting
This is considered to be the film speed (check on film speed/film sensitivity)
Picture Quality
This is the file size of the photo you are to capture
White Balance
There are several settings for the white balance such as daylight balance, tungsten, auto, custom (custom balance allows you to manually set your color white by taking a photograph of any white surface you point the camera to.) Set the white balance in accordance to your lighting condition to make sure that white appears as white and does not cast any color on the photo.
Different types of metering modes
1.Matrix metering or evaluative (name depends on the manufacturer.) This meter mode will get the average light of the whole frame.
2. Center weighted metering. This meters the subject closer to the center of the frame.
3. Spot metering. Meters a very specific spot and you need to override the meter reading if the surface is not middle grey
Photography means painting with light. Now, in order for you to produce a photograph you need light, light to bounce off from an image, pass through the lens and that light that bounced off from the image is also the light that is captured on the film or a digital sensor.
Exposure means to expose the film on light to allow the capture of image. Expose it more than the recommended setting then the picture gets over exposed, as a result the image is too bright. Expose the film under the recommended setting means the pictures get under exposed or the picture gets dim. Question! How do you know the proper exposure? ( Notice I used proper exposure and not correct exposure because there is no correct exposure in photography. Some photos are nicer when it is a bit dark or a bit bright. The final call is with the photographer. The light meter is just a guideline to ensure the photo taken is neither too dark nor too light.) Most cameras today comes with built in exposure meters, if it doesn’t then you need a light meter or spot meter to check the right amount of exposure. Next question! How do you read exposure? First and foremost you have to understand how a camera meters work. Camera meters are stupid they don’t see colors only the reflection of light; they only see dark, middle grey, and bright light. Remember this, Black does absorb light so if you point a meter or the camera on a dark surface the meter thinks that the camera needs to expose the film longer therefore if you shoot using the setting given by the meter the result would be an overexposed picture, so you have to override the meter by closing 1 or 2 stops either the aperture or shutter speed. On the other hand, if you meter a white surface or bright surface the meter will think that it is capturing a very bright surface because white bounces off light so if you use the setting recommended by the light meter the result will be an underexposed photo so again, override your meter by opening 1 or 2 stops, either the aperture or shutter speed. Metering a middle grey surface will be the right way to do it. Its either you buy a middle grey card or if you don’t get one, meter a white surface and just adjust the aperture or shutter by 1 stop to 2 stops over exposed. If there is no white surface try it on dark surface just open up by 1 or 2 stops.
Nowadays everything is easier because of the digital camera but what if there is a need to use a film camera. It is still best to know the basics of photography rather than relying on technology.
Taking a picture
In order to capture an image you need to remember a few things before clicking the shutter.
1. Be sure to set the proper exposure or to put it in any exposure mode (manual, shutter priority, aperture priority or program) you desire
2. Hold the camera properly to secure from any camera shake
3. Focus on the subject. (If you are taking a picture of a human subject be sure to focus on the eye) Make sure that focus is correct to make the subject sharp.
4. Compose the Picture using some rules in composition (rules will be discussed in the following lessons).
So you want to be a photographer?
There are different levels of photography, on the leisure class there would be the clicker who would shoot occasionally or when he wants to. There are the serious hobbyists who would go around spending for gadgets and travel just to satisfy their need to capture images. There are the intellectual photographers who are the knowledge eaters, they read and read and read but do not shoot, ask them anything and you get an instant answer. There are the professional photographers who earn their living getting paid to take pictures. They can be wedding photographers, photojournalists or commercial photographers. And there is the artist photographer who just shoots what he likes to shoot for the sake of art. Any of these I mentioned can be you so before even thinking of advancing your way to being called a PHOTOGRAPHER you first need to know the kind of photography you want to do.
In order to know what you want you need to determine your goal, ask yourself “why do I want to learn”? maybe because you want to be a professional photographer or just make it a hobby or just to know. After answering the question ask yourself “What is my interest or what it is that interests me?” is it shooting landscapes? People? Candid moments? Sports? Cars? To know the branch of photography you are interested in it is best to check out newspapers, books and magazines to know the kind of photography that strikes you. A portrait maybe or an advertisement or documentary photo. Only by knowing these things will make you appreciate photography because you know what you want and if you get what you want, then you know you have a new knowledge.
Assignment A:
1. Write down the reasons why you want to learn photography, where are you going to use your knowledge? What kind photographer you want to be, a professional if yes what kind of practice, if no, what is the extent of your hobby? The answers here are important it will tell if you want to be a professional or just a hobbyist
2. get a photo you personally took and write down the reasons why you like it. Take hold of it because you will compare it to you pictures after finishing all the assignments.
3. Get a photo you did not take, something that caught your attention, it maybe from a magazine, newspaper or Internet, anywhere as long as you did not take it and then write down the reasons why you like it. The reason will determine the style you want for your shooting
Practical photography
This is a lesson that will help readers jump-start their way into taking pictures. I made everything easy to read and understand, no camera jargons or technical hullabaloos. I didn’t put a lot of information because I want readers have the freedom of trying and experimenting, by doing so students and readersbecome more creative in their approach to photography.
The main goal of this reading is to elevate the skill of a photographer with the introduction of technical terms and technical skills in photography. And at the same time developing the creativity of the photographer by doing exercises suggested in this manual
These are just the basics and the important foundations for an inspiring photographer. Much of the photographer’s knowledge is gained through shooting and experience. I learned mine through shooting, and shooting a lot of films. To those who want to learn photography it doesn’t just take a click of the camera’s shutter to capture a subject. A subject needs to be treated with a lot of thought and careful study on how to make it appealing as a photograph. Remember that a photograph is never accompanied by words so the message of the photograph has to be clear, if the message is happy baby just make sure that the body language of the baby is happy by showing a smile or laughter.
Learn and enjoy through this simple practical photography guidelines.
Basic Vocabulary:
Camera is a tool used to capture an image to make a photograph.
Lens is a part of the camera where light passes through.
Photograph is an image captured on Film or imaging sensor
Film is where the image is recorded.
Imaging sensor is the “film” of the digital camera.
Film Sensitivity is the measure of film’s sensitivity to light. It is measure in ISO 100, 200, 400, 800 and 1600. Lower the number requires longer exposure, the higher the number the more sensitive to light thus requiring less light to capture the image. Practically, if you don’t have a tripod use a higher sensitivity on low light situation because this will not require longer exposure but quality may suffer because of noise or grain on the photo.
(A noise or grain is like little dust particle on the all over photo.)
Sample of a grainy or noisy photo, the picture looks rough.

Aperture* is the hole or iris in the lens where light passes through. This means that the bigger the hole the more light is allowed to reach the film or digital sensor (for digital camera). The symbol is f, and the following are the openings f/16, f/11, f/8, f/5.6, f/4, f/2.8, f/2, f/1.4. to open up one stop means turning the aperture from f/16 to f/11 (if your setting is on f/16), to open up two stop (if the setting is on f/16) means turning the setting from f/16 to f/8. Remember that the lower the number the bigger the opening of the aperture therefore allowing more light to pass through the hole and the higher the number the less light that comes in
Shutter speed* is the time for which the shutter curtain is held open during the taking of an image to allow light to reach the film or imaging sensor. The longer the shutter is open the more light captured on film. Common shutter speeds are from fast to slow: 1/2000, 1/1000, 1/500, 1/250, 1/125, 1/60, 1/30, 1/15, 1/8, 1/4, 1/2 of a second and 1 second. The symbol B on the shutter speed dial means manually leaving the shutter open until the photographer closes it. Leaving the shutter on setting like 1/2 of a second means more light is recorded on film.
*Check your camera manual on how to or where to adjust
Things to know about your camera Digital or Film
Exposure modes:
1. Manual. This setting will allow you to manipulate the shutter speed and aperture setting giving you more creativity to your image
2. Aperture Priority. This setting allows you to manipulate on the aperture setting making your shutter speed to automatically set its own exposure. You normally use this when you want a shallow or great depth of field (Depth of field or DOF is explained on later lessons)
3. Shutter Priority. This allows you to assign a shutter of your choice and the aperture automatically sets itself as you shoot. You normally use this if you want to have an effect of blurring or freezing motion which I shall explain on later lessons
4. Program mode. This mode allows you to just point and shoot. The camera take care of everything.
ISO setting
This is considered to be the film speed (check on film speed/film sensitivity)
Picture Quality
This is the file size of the photo you are to capture
White Balance
There are several settings for the white balance such as daylight balance, tungsten, auto, custom (custom balance allows you to manually set your color white by taking a photograph of any white surface you point the camera to.) Set the white balance in accordance to your lighting condition to make sure that white appears as white and does not cast any color on the photo.
Different types of metering modes
1.Matrix metering or evaluative (name depends on the manufacturer.) This meter mode will get the average light of the whole frame.
2. Center weighted metering. This meters the subject closer to the center of the frame.
3. Spot metering. Meters a very specific spot and you need to override the meter reading if the surface is not middle grey
Photography means painting with light. Now, in order for you to produce a photograph you need light, light to bounce off from an image, pass through the lens and that light that bounced off from the image is also the light that is captured on the film or a digital sensor.
Exposure means to expose the film on light to allow the capture of image. Expose it more than the recommended setting then the picture gets over exposed, as a result the image is too bright. Expose the film under the recommended setting means the pictures get under exposed or the picture gets dim. Question! How do you know the proper exposure? ( Notice I used proper exposure and not correct exposure because there is no correct exposure in photography. Some photos are nicer when it is a bit dark or a bit bright. The final call is with the photographer. The light meter is just a guideline to ensure the photo taken is neither too dark nor too light.) Most cameras today comes with built in exposure meters, if it doesn’t then you need a light meter or spot meter to check the right amount of exposure. Next question! How do you read exposure? First and foremost you have to understand how a camera meters work. Camera meters are stupid they don’t see colors only the reflection of light; they only see dark, middle grey, and bright light. Remember this, Black does absorb light so if you point a meter or the camera on a dark surface the meter thinks that the camera needs to expose the film longer therefore if you shoot using the setting given by the meter the result would be an overexposed picture, so you have to override the meter by closing 1 or 2 stops either the aperture or shutter speed. On the other hand, if you meter a white surface or bright surface the meter will think that it is capturing a very bright surface because white bounces off light so if you use the setting recommended by the light meter the result will be an underexposed photo so again, override your meter by opening 1 or 2 stops, either the aperture or shutter speed. Metering a middle grey surface will be the right way to do it. Its either you buy a middle grey card or if you don’t get one, meter a white surface and just adjust the aperture or shutter by 1 stop to 2 stops over exposed. If there is no white surface try it on dark surface just open up by 1 or 2 stops.
Nowadays everything is easier because of the digital camera but what if there is a need to use a film camera. It is still best to know the basics of photography rather than relying on technology.
Taking a picture
In order to capture an image you need to remember a few things before clicking the shutter.
1. Be sure to set the proper exposure or to put it in any exposure mode (manual, shutter priority, aperture priority or program) you desire
2. Hold the camera properly to secure from any camera shake
3. Focus on the subject. (If you are taking a picture of a human subject be sure to focus on the eye) Make sure that focus is correct to make the subject sharp.
4. Compose the Picture using some rules in composition (rules will be discussed in the following lessons).
Subscribe to:
Posts (Atom)