Friday, June 18, 2010
Thursday, June 17, 2010

Sunday, April 15, 2007
Foundations to Creative Photography
I will be having a lecture in Informatics Festival Mall.
For Inquiries Please call 027710402
Know the Practical Basics of PHOTOGRAPHY!
For Inquiries Please call 027710402
Know the Practical Basics of PHOTOGRAPHY!
Monday, March 26, 2007
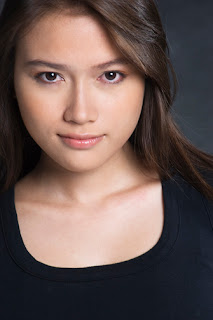
Some portraiture basics
Portraiture can be very challenging because it doesn’t only involve Technical knowledge in photography but also knowledge in personal interaction. This means that the photographer needs to build a rapport with the subject. It involves talking to the subject, informing the subject the idea of the shoot and of course making the subject feel relaxed in front of the camera.
What I normally do in paid works is ask the client what they want or how they wantphotograph to come out. I tell them my idea about the whole shoot and encourage them to interact, I then inform the subject about the whole idea of the photo shoot. A photographer should know how to motivate a subject and bring out the character of the subject. This makes a good photo and a satisfied client.
What lens do you use?
You can use any lens you want as long as you know the effect of the lens to the subject.
A wide-angle lens such as 24mm-50mm on a 35mm camera gives distortion to the face of the subject and the outcome is not very flattering. However this lens is good to use for environmental portraits to show wider angle of view.
A telephoto lens is more suitable for headshots because the face is not distorted. A good range would be 85mm-135mm on a 35mm camera.

(example of an environmental portraiture)
Focus
In portraiture always focus in the subject’s eyes and then recompose the whole picture.
Posing
Head and shoulder should be at an angle. This makes the subject look more dynamic and less heavy. In order to have a more relaxed looking shoulder, ask the model not to keep their feet together, instead the other foot should be brought forward. Also ask the subject to tilt their head in different directions for movement.
Watch those hands and fingers. The hands are as important as the face, it is where people look at after the face. You can ask the subject to hold the waist or maybe ask them to hold something that can help in the composition of the picture or put them in their chin, the arm will serve as a line that directs viewer's eyes to the face.
Smile or not to smile. It depends on how you like the picture to look like, both have their own characteristics. If you want a happy mood then ask the subject to smile or laugh but if you want a more formal pose ask the subject not to smile or ask them to think of something serious. Always look for that expression, laughing old people is always nice to capture or crying babies.
Portraiture
Tips:
∑ Look at different magazines to have different ideas.
∑ Visualize what you want for your photograph.
∑ Get beautiful models and those who can pose in front of a camera.
∑ Be copycats. Try to copy lighting, posing and effects this will make you technically proficient. Experiment after.
∑ Practice, practice, practice.
∑ For studio portraits get a good make up artists.
What I normally do in paid works is ask the client what they want or how they wantphotograph to come out. I tell them my idea about the whole shoot and encourage them to interact, I then inform the subject about the whole idea of the photo shoot. A photographer should know how to motivate a subject and bring out the character of the subject. This makes a good photo and a satisfied client.
What lens do you use?
You can use any lens you want as long as you know the effect of the lens to the subject.
A wide-angle lens such as 24mm-50mm on a 35mm camera gives distortion to the face of the subject and the outcome is not very flattering. However this lens is good to use for environmental portraits to show wider angle of view.
A telephoto lens is more suitable for headshots because the face is not distorted. A good range would be 85mm-135mm on a 35mm camera.

(example of an environmental portraiture)
Focus
In portraiture always focus in the subject’s eyes and then recompose the whole picture.
Posing
Head and shoulder should be at an angle. This makes the subject look more dynamic and less heavy. In order to have a more relaxed looking shoulder, ask the model not to keep their feet together, instead the other foot should be brought forward. Also ask the subject to tilt their head in different directions for movement.
Watch those hands and fingers. The hands are as important as the face, it is where people look at after the face. You can ask the subject to hold the waist or maybe ask them to hold something that can help in the composition of the picture or put them in their chin, the arm will serve as a line that directs viewer's eyes to the face.
Smile or not to smile. It depends on how you like the picture to look like, both have their own characteristics. If you want a happy mood then ask the subject to smile or laugh but if you want a more formal pose ask the subject not to smile or ask them to think of something serious. Always look for that expression, laughing old people is always nice to capture or crying babies.

Portraiture
Tips:
∑ Look at different magazines to have different ideas.
∑ Visualize what you want for your photograph.
∑ Get beautiful models and those who can pose in front of a camera.
∑ Be copycats. Try to copy lighting, posing and effects this will make you technically proficient. Experiment after.
∑ Practice, practice, practice.
∑ For studio portraits get a good make up artists.
Thursday, March 22, 2007
Slow shutter creativity!

(example of shooting while twisting the camera.)
Have you ever been bored shooting sharp pictures, by-the-book technicals? Have you ever wanted to try something unusual? i guess this is just the right article for you to read. Let me share with you some fun stuff and out of the box techniques that will bring out a new paradigm in your photos and boost your creativity.
The tricks here are done with a slow shutter to show a sense of movement in the image and no post processing required, just between you and your good old camera.

(example of slow sync flash technique.)
=Zoom burst. This is done by setting your
camera on a slow shutter like 1/30 or slower. focus on your subject and simultaneously twist your zoom lens while pressing the shutter! Be surprised with the final image.
=Bulb setting trick. You need patience before you can master this trick. This trick is the secret to capturing star trails and moving city traffic at night. You need a tripod and long battery life for this technique.
=Twist. Twisting your camera gives a swirling and abstract effect on the image.
=Panning. Follow he moving subject with your camera while pressing the shutter.
=Slow sync flash. Put your setting on a slow shutter and just the flash. This is great on a low light situation e.g inside a bar or disco. Experiment by either shooting still or moving the camera in whatever directions your want.

example of shooting street cars on slow shutter.)
Wednesday, March 21, 2007
People photography
-When in a different and you want to take pictures of people, it is best to know the culture of the country. Read about their culture or ask from their travel authority.
-As much as possible refrain from using telephoto lens. it makes people paranoid. You don't want a person with a big camera following you around right?

-Always smile, a smile takes away fear from people around you. And of course you appear as a friend to them.
-Try and talk to the person you want to take picture of, by doing this the subject gets relaxed and you will have more opportunities for different shots.
-Take candids. who knows, results can be amazing! Just be sure your shutter speed is fast enough to capture those moments.
-Take their photo while doing a local ritual or ceremony. This is an automatic story teller about the person and the country.
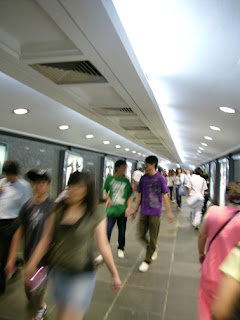
-Take photos of people in public places. This is very interesting because this will show how majority of the people are in their country in terms of culture.
Tips on choosing the right Digital Camera
One of the hardest things in picking up photography as a hobby is in choosing the right camera. There are different choices out there with hundreds of different features that make choosing even harder. The following are suggestions when buying a new camera.
1. Know thyself.
Know what kind of shooter you are. This will actually determine what you really need. If you are the type who shoots in automatic mode then you don't have to spend on expensive gadgets will all the features you wont be using.
2. Will i be printing what i shoot or not?
This is where megapixel talk comes in. If most of the picture you are taking is for website upload or email then you do not need a camera higher than a 3 megapixel. You only need 4 mega pixel or higher when you want to start printing at 4x6 inches.
3. Check out the post purchase expenses
A DSLR has more extras than a point and shoot, obviously you will be spending more with a DSLR. When you buy a DSLR you would need to buy lenses, bags, filters,grips, sensor cleaners,and flash.
4. How much are you willing to spend.
You can spend as much as you want as long you have the money to spend.
5. Ask from people using the camera you want.
This will actually give you a first hand information about the camera you want. you can even test it to have a feel of the camera.
Creativity Exercises
Exercise A = Story telling
Do the following exercise once a week for the next 3 months (this will be your once a week date with your artist). The exercise will help you in enhancing your story telling skills, what you need to do is to go to the places listed and then tell the
story about the place or the people in the place. You may use any style you want, you may or may break the rules of composition, the important thing is doing the shoot creatively. Shoot as many as you can and have fun.
Place:
Zoo
Park
Mall
Wet market
Old Church
Office
School
Heritage site
Sports game
Restaurant
2nd hand car shop
Nature sight
New church
Exercise B = Alphabet skills
This exercise will help you in you Perception Skills. Find the shapes of Alphabet in anything you see under the sun. It is up to you how you want to do it as long as you do it creatively.
Exercise C = weekly Photo exercise
By doing this, you will be able to enhance your skills in photography, this will also help you in shooting consistently for the next 365 days
Week 1 Fire
Week 2 Stone
Week 3 Crowd
Week 4 Children
Week 5 One
Week 6 Letter A
Week 7 Pain
Week 8 Animal
Week 9 Lines
Week 10 Big & Small
Week 11 Bad
Week 12 Culture
Week 13 Prayer
Week 14 Silhouette
Week 15 Rule of thirds
Week 16 Fish
Week 17 Dawn
Week 18 Music
Week 19 Famous
Week 20 Motion
Week 21 Dance
Week 22 Mountains
Week 23 Egg
Week 24 Abundance
Week 25 Fan
Week 26 Height
Week 27 Macro
Week 28 Gods
Week 29 I
Week 30 Jumping
Week 31 Leading lines
Week 32 Kissable
Week 33 Moon
Week 34 Love
Week 35 Morning dew
Week 36 Street
Week 37 Heat
Week 38 Country side
Week 39 Short
Week 40 Anything
Week 41 Rivers
Week 42 Framing
Week 43 Colors
Week 44 Candid
Week 45 Strength
Week 46 Harmony
Week 47 Something red
Week 48 Lightning
Exercise D
This exercise will help you in making your own theme. Use the alphabet and numbers to make your own theme
A is for (e.g)Ashes
B
C
D
E
F
G
H
I
J
K
L
M
N
O
P
Q
R
S
T
U
V
W
X
Y
Z
1 Dried leaf
2
3
4
5
6
7
8
9
Developing Creativity

CREATIVITY DEVELOPMENT
Creativity is not a word made just for artists, it’s a word for everyone. You can be creative in your cooking, creative in gardening, in driving, etc.. Creative came from the word Creation which means creating something from nothing, same with when we create art, we create beautiful flowers in the nothingness of canvass or create beautiful pictures of the sunset from the nothingness of a blank film paper. Creativity is within us, all we need to do is to wake it up or tap it.
Things to remember about creativity:
1. Love yourself and your art. Your art is unique to you so be careful with your inner critique. Often times it is us who judge our art. We say that its not nice, I don’t like it, this wont sell or they will make fun of my art. These are the things that we should be careful of, we are not in the right position to judge ourselves when it comes to our art, our inner self is our enemies, this will stop us from making art. The important thing is to just do it.
2. Have time for art. Working too much or being too busy will kill the artist in us. We are all born with talents, we just need to enhance it. Keeping it inside will only kill it, working too hard and not having time for our inner artist is not good for us. Take strolls or do thing another way, try taking a different route going to work or try eating with 2 spoons. Have fun and have time to nurture and nourish the artist within. Set aside 1 day a week to shoot, shoot anything and play!

3. Shoot, shoot, shoot! Don’t shoot to be famous or to get paid. Shoot because you love doing it, shoot because it is your passion, shoot not to be praised. Shoot your subjects from different angles, different exposures, underexposed, overexposed. Just shoot and shoot because the best way to learn is by doing.
4. Have fun. Art is suppose to be fun, don’t we love art classes. Now that we are older art should still be the same. Take time to think before clicking but don’t think too much or you will miss the moment. Also, don’t think too much in how you want to compose a photo, just know the basics by heart and let it flow out from you, but be sure to look around the frame before clicking.
Monday, March 19, 2007
Useful Camera Filters for Color Photography
Camera filters are a must equipment for photographers, it enhances the images and gives a different effect to the final photo.
UV Filter = Absorbs ultraviolet rays and creates less hazy photos. It is best to leave a UV filter on your camera lens at all times to protect the lens.
Polarizing Filters = It is best used when the sky is not too blue because using this intensifies the color of the sky giving it a color of deep blue. It also eliminates glare when you want to shoot through water.
Neutral Dentisty (ND) Filter = Reduces the amount of light on a very bright sunny day. you can use this if you want to use longer shutter speed.
Graduated ND Filter = This filter is best used for landscape where the sky is extremely bright compard to the foreground. Using this will compensate for the light stop differential between the foreground and background, making the exposure even for the background and foreground.
There are other filters out in the market that can help modify the image. try shooting with and without filter to see the difference.
Subscribe to:
Posts (Atom)