I will be having a lecture in Informatics Festival Mall.
For Inquiries Please call 027710402
Know the Practical Basics of PHOTOGRAPHY!
Sunday, April 15, 2007
Monday, March 26, 2007
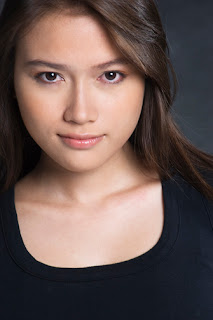
Some portraiture basics
Portraiture can be very challenging because it doesn’t only involve Technical knowledge in photography but also knowledge in personal interaction. This means that the photographer needs to build a rapport with the subject. It involves talking to the subject, informing the subject the idea of the shoot and of course making the subject feel relaxed in front of the camera.
What I normally do in paid works is ask the client what they want or how they wantphotograph to come out. I tell them my idea about the whole shoot and encourage them to interact, I then inform the subject about the whole idea of the photo shoot. A photographer should know how to motivate a subject and bring out the character of the subject. This makes a good photo and a satisfied client.
What lens do you use?
You can use any lens you want as long as you know the effect of the lens to the subject.
A wide-angle lens such as 24mm-50mm on a 35mm camera gives distortion to the face of the subject and the outcome is not very flattering. However this lens is good to use for environmental portraits to show wider angle of view.
A telephoto lens is more suitable for headshots because the face is not distorted. A good range would be 85mm-135mm on a 35mm camera.

(example of an environmental portraiture)
Focus
In portraiture always focus in the subject’s eyes and then recompose the whole picture.
Posing
Head and shoulder should be at an angle. This makes the subject look more dynamic and less heavy. In order to have a more relaxed looking shoulder, ask the model not to keep their feet together, instead the other foot should be brought forward. Also ask the subject to tilt their head in different directions for movement.
Watch those hands and fingers. The hands are as important as the face, it is where people look at after the face. You can ask the subject to hold the waist or maybe ask them to hold something that can help in the composition of the picture or put them in their chin, the arm will serve as a line that directs viewer's eyes to the face.
Smile or not to smile. It depends on how you like the picture to look like, both have their own characteristics. If you want a happy mood then ask the subject to smile or laugh but if you want a more formal pose ask the subject not to smile or ask them to think of something serious. Always look for that expression, laughing old people is always nice to capture or crying babies.
Portraiture
Tips:
∑ Look at different magazines to have different ideas.
∑ Visualize what you want for your photograph.
∑ Get beautiful models and those who can pose in front of a camera.
∑ Be copycats. Try to copy lighting, posing and effects this will make you technically proficient. Experiment after.
∑ Practice, practice, practice.
∑ For studio portraits get a good make up artists.
What I normally do in paid works is ask the client what they want or how they wantphotograph to come out. I tell them my idea about the whole shoot and encourage them to interact, I then inform the subject about the whole idea of the photo shoot. A photographer should know how to motivate a subject and bring out the character of the subject. This makes a good photo and a satisfied client.
What lens do you use?
You can use any lens you want as long as you know the effect of the lens to the subject.
A wide-angle lens such as 24mm-50mm on a 35mm camera gives distortion to the face of the subject and the outcome is not very flattering. However this lens is good to use for environmental portraits to show wider angle of view.
A telephoto lens is more suitable for headshots because the face is not distorted. A good range would be 85mm-135mm on a 35mm camera.

(example of an environmental portraiture)
Focus
In portraiture always focus in the subject’s eyes and then recompose the whole picture.
Posing
Head and shoulder should be at an angle. This makes the subject look more dynamic and less heavy. In order to have a more relaxed looking shoulder, ask the model not to keep their feet together, instead the other foot should be brought forward. Also ask the subject to tilt their head in different directions for movement.
Watch those hands and fingers. The hands are as important as the face, it is where people look at after the face. You can ask the subject to hold the waist or maybe ask them to hold something that can help in the composition of the picture or put them in their chin, the arm will serve as a line that directs viewer's eyes to the face.
Smile or not to smile. It depends on how you like the picture to look like, both have their own characteristics. If you want a happy mood then ask the subject to smile or laugh but if you want a more formal pose ask the subject not to smile or ask them to think of something serious. Always look for that expression, laughing old people is always nice to capture or crying babies.

Portraiture
Tips:
∑ Look at different magazines to have different ideas.
∑ Visualize what you want for your photograph.
∑ Get beautiful models and those who can pose in front of a camera.
∑ Be copycats. Try to copy lighting, posing and effects this will make you technically proficient. Experiment after.
∑ Practice, practice, practice.
∑ For studio portraits get a good make up artists.
Thursday, March 22, 2007
Slow shutter creativity!

(example of shooting while twisting the camera.)
Have you ever been bored shooting sharp pictures, by-the-book technicals? Have you ever wanted to try something unusual? i guess this is just the right article for you to read. Let me share with you some fun stuff and out of the box techniques that will bring out a new paradigm in your photos and boost your creativity.
The tricks here are done with a slow shutter to show a sense of movement in the image and no post processing required, just between you and your good old camera.

(example of slow sync flash technique.)
=Zoom burst. This is done by setting your
camera on a slow shutter like 1/30 or slower. focus on your subject and simultaneously twist your zoom lens while pressing the shutter! Be surprised with the final image.
=Bulb setting trick. You need patience before you can master this trick. This trick is the secret to capturing star trails and moving city traffic at night. You need a tripod and long battery life for this technique.
=Twist. Twisting your camera gives a swirling and abstract effect on the image.
=Panning. Follow he moving subject with your camera while pressing the shutter.
=Slow sync flash. Put your setting on a slow shutter and just the flash. This is great on a low light situation e.g inside a bar or disco. Experiment by either shooting still or moving the camera in whatever directions your want.

example of shooting street cars on slow shutter.)
Wednesday, March 21, 2007
People photography
-When in a different and you want to take pictures of people, it is best to know the culture of the country. Read about their culture or ask from their travel authority.
-As much as possible refrain from using telephoto lens. it makes people paranoid. You don't want a person with a big camera following you around right?

-Always smile, a smile takes away fear from people around you. And of course you appear as a friend to them.
-Try and talk to the person you want to take picture of, by doing this the subject gets relaxed and you will have more opportunities for different shots.
-Take candids. who knows, results can be amazing! Just be sure your shutter speed is fast enough to capture those moments.
-Take their photo while doing a local ritual or ceremony. This is an automatic story teller about the person and the country.

-Take photos of people in public places. This is very interesting because this will show how majority of the people are in their country in terms of culture.
Tips on choosing the right Digital Camera
One of the hardest things in picking up photography as a hobby is in choosing the right camera. There are different choices out there with hundreds of different features that make choosing even harder. The following are suggestions when buying a new camera.
1. Know thyself.
Know what kind of shooter you are. This will actually determine what you really need. If you are the type who shoots in automatic mode then you don't have to spend on expensive gadgets will all the features you wont be using.
2. Will i be printing what i shoot or not?
This is where megapixel talk comes in. If most of the picture you are taking is for website upload or email then you do not need a camera higher than a 3 megapixel. You only need 4 mega pixel or higher when you want to start printing at 4x6 inches.
3. Check out the post purchase expenses
A DSLR has more extras than a point and shoot, obviously you will be spending more with a DSLR. When you buy a DSLR you would need to buy lenses, bags, filters,grips, sensor cleaners,and flash.
4. How much are you willing to spend.
You can spend as much as you want as long you have the money to spend.
5. Ask from people using the camera you want.
This will actually give you a first hand information about the camera you want. you can even test it to have a feel of the camera.
Creativity Exercises
Exercise A = Story telling
Do the following exercise once a week for the next 3 months (this will be your once a week date with your artist). The exercise will help you in enhancing your story telling skills, what you need to do is to go to the places listed and then tell the
story about the place or the people in the place. You may use any style you want, you may or may break the rules of composition, the important thing is doing the shoot creatively. Shoot as many as you can and have fun.
Place:
Zoo
Park
Mall
Wet market
Old Church
Office
School
Heritage site
Sports game
Restaurant
2nd hand car shop
Nature sight
New church
Exercise B = Alphabet skills
This exercise will help you in you Perception Skills. Find the shapes of Alphabet in anything you see under the sun. It is up to you how you want to do it as long as you do it creatively.
Exercise C = weekly Photo exercise
By doing this, you will be able to enhance your skills in photography, this will also help you in shooting consistently for the next 365 days
Week 1 Fire
Week 2 Stone
Week 3 Crowd
Week 4 Children
Week 5 One
Week 6 Letter A
Week 7 Pain
Week 8 Animal
Week 9 Lines
Week 10 Big & Small
Week 11 Bad
Week 12 Culture
Week 13 Prayer
Week 14 Silhouette
Week 15 Rule of thirds
Week 16 Fish
Week 17 Dawn
Week 18 Music
Week 19 Famous
Week 20 Motion
Week 21 Dance
Week 22 Mountains
Week 23 Egg
Week 24 Abundance
Week 25 Fan
Week 26 Height
Week 27 Macro
Week 28 Gods
Week 29 I
Week 30 Jumping
Week 31 Leading lines
Week 32 Kissable
Week 33 Moon
Week 34 Love
Week 35 Morning dew
Week 36 Street
Week 37 Heat
Week 38 Country side
Week 39 Short
Week 40 Anything
Week 41 Rivers
Week 42 Framing
Week 43 Colors
Week 44 Candid
Week 45 Strength
Week 46 Harmony
Week 47 Something red
Week 48 Lightning
Exercise D
This exercise will help you in making your own theme. Use the alphabet and numbers to make your own theme
A is for (e.g)Ashes
B
C
D
E
F
G
H
I
J
K
L
M
N
O
P
Q
R
S
T
U
V
W
X
Y
Z
1 Dried leaf
2
3
4
5
6
7
8
9
Developing Creativity

CREATIVITY DEVELOPMENT
Creativity is not a word made just for artists, it’s a word for everyone. You can be creative in your cooking, creative in gardening, in driving, etc.. Creative came from the word Creation which means creating something from nothing, same with when we create art, we create beautiful flowers in the nothingness of canvass or create beautiful pictures of the sunset from the nothingness of a blank film paper. Creativity is within us, all we need to do is to wake it up or tap it.
Things to remember about creativity:
1. Love yourself and your art. Your art is unique to you so be careful with your inner critique. Often times it is us who judge our art. We say that its not nice, I don’t like it, this wont sell or they will make fun of my art. These are the things that we should be careful of, we are not in the right position to judge ourselves when it comes to our art, our inner self is our enemies, this will stop us from making art. The important thing is to just do it.
2. Have time for art. Working too much or being too busy will kill the artist in us. We are all born with talents, we just need to enhance it. Keeping it inside will only kill it, working too hard and not having time for our inner artist is not good for us. Take strolls or do thing another way, try taking a different route going to work or try eating with 2 spoons. Have fun and have time to nurture and nourish the artist within. Set aside 1 day a week to shoot, shoot anything and play!

3. Shoot, shoot, shoot! Don’t shoot to be famous or to get paid. Shoot because you love doing it, shoot because it is your passion, shoot not to be praised. Shoot your subjects from different angles, different exposures, underexposed, overexposed. Just shoot and shoot because the best way to learn is by doing.
4. Have fun. Art is suppose to be fun, don’t we love art classes. Now that we are older art should still be the same. Take time to think before clicking but don’t think too much or you will miss the moment. Also, don’t think too much in how you want to compose a photo, just know the basics by heart and let it flow out from you, but be sure to look around the frame before clicking.
Monday, March 19, 2007
Useful Camera Filters for Color Photography
Camera filters are a must equipment for photographers, it enhances the images and gives a different effect to the final photo.
UV Filter = Absorbs ultraviolet rays and creates less hazy photos. It is best to leave a UV filter on your camera lens at all times to protect the lens.
Polarizing Filters = It is best used when the sky is not too blue because using this intensifies the color of the sky giving it a color of deep blue. It also eliminates glare when you want to shoot through water.
Neutral Dentisty (ND) Filter = Reduces the amount of light on a very bright sunny day. you can use this if you want to use longer shutter speed.
Graduated ND Filter = This filter is best used for landscape where the sky is extremely bright compard to the foreground. Using this will compensate for the light stop differential between the foreground and background, making the exposure even for the background and foreground.
There are other filters out in the market that can help modify the image. try shooting with and without filter to see the difference.
Saturday, March 17, 2007
Lens, focus, aperture and its connection to depth of field
Here is a "no beating around the bush tip" on depth of field.
Choosing the right depth of field techniques to your shot can make or break a photo, it can either make a landscape or portrait look good or crappy. here are 2 tips that is practical and easy to ff.
---------------------------------------------------------------------------------------
A shallow depth of field (selective focus)effect is normally best used with portraits
1. If you want a SHALLOW DEPTH OF FIELD FOR A PORTRAIT SHOT, use a lens with a focal length of 200m or up, set your aperture to around f/2.8 and ask the subject to pose away from the background, maybe 20 steps away. This should give you a blurred background a nice and professional photo should come out.
---------------------------------------------------------------------------------------
Extensive depth of field is when all the images from foreground to background are sharp. This is best use for landscape photography.
2. If you want all the images in the photo to be SHARP use a wide angle lens. The range could be 16mm to 24mm (lens with these focal lengths produce extensive or great depth of field) and put the aperture to the smallest opening (such as f/16 or f/22), use also the scale marking on the lens next to the aperture ring to estimate the depth of field(check your manual on reading the scale) . For those without markings on lens, check the camera manual for estimating depth of field.
Tuesday, March 13, 2007
Landscape photography

Tips on Landscape photography
1. Know the best time to shoot you landscape. Different places have different characteristics at different times of the day, so it is best to go to the same place at different times of the day
2. Use wide-angle lens. It is best to use wide-angle lens when shooting landscapes because there is a wider angle of view.

3. Use maximum depth of field. By doing this the landscape will look nice because everything on the picture is sharp
4. In landscapes is best to have a foreground to add dimension to the photo.
5. Tripod comes in handy especially shooting in low light situation.

Travel photography tips

TRAVELLING TIPS
What to shot when traveling
1. Check out local heritage site or sites that have history
2. Look for landscapes outside the city
3. Shoot culture such as local festivals or natives
4. Observe and document how people are, go to places where people are plenty such as cafes, parks, market.
5. keep walking

What should be inside a camera bag when traveling:
1. Camera. 1 camera body is enough an SLR or rangefinder camera is good, either film or digital
2. Lens. Wide-angle lens and telephoto lens or if you have a zoom lens with a good ranges, bring it
3. Films. Depends on how long you would be staying in a place. Also make sure to secure your film for the airport x-ray.
4. Flash, charger and battery.
5. Filters. For me there are 3 useful filters for me. Polarizing filter, yellow filter (for black and white, and neutral density filter)
6. Tripod. Use this on low light situations.

In traveling its best to keep fewer gadgets to bring. Its not good to catch a lot of attention and you don’t want snatchers to swarm around you.

*ALL PICTURES WERE TAKEN IN SINGAPORE (2007)
Tips on shooting weddings

Recommended gears:
• Camera body (best to have 2 bodies so you don’t have to keep on changing lens)
• Wide angle lens and telephoto lens
• Flash
• Memory cards
Recommended camera settings:
• Aperture Priority
• ISO 400-800 ( just watch out for the grain if your camera produces grainy photos on higher iso)
• Jpeg or Raw + jpeg
• Auto white balance
What to shoot:
during preparation of bride:
• Bride while having make up
• Bride beside the dress
• Rings, coins, Bible, array, etc…
• Bride with family and Maid of honor
• Bride’s portraits on her gown. Experiment with some dramatic lighting, shoot with and without flash, silhouette is always a winner

In church
• Document the entourage march
• Watch for emotions from the groom and people in the church
• Take a portrait of the bride looking out the window
• Take a photo of the back of the gown of the bride before the march. This is best taken using a wide angle lens to include the church doors
• Look for details in the church such as flower arrangements, flowers of the entourage. Things that are normally ignored but important to the wedding
• Take pictures of the bride while marching, this is also the best time to look at the grooms emotions and the parents of the bride
• Look for candid moments in church, this is the best time to shoot candids.
• Shoot the ceremony
• Don’t forget to shoot the “kiss”
• Shoot the recessional and the throwing of confetti. Be creative, you may ask the groom to carry the bride or let them kiss while taking picture .
In reception:
• 1st dance. Try different angles
• Cake cutting
• Reactions of people during programs and video presentation
• Get the portraits of all the people who will give the speech
• Garter & bouquet part
Remember to always get to know the people who are getting married, by doing you build a rapport with them making the couple easier to document. You also need to ask them what they want their pictures to look like, more candid shots than posed, a lot cheesy moments than laughing moments. If you give them what they want the couple will definitely be happy.
Be creative and different. What I put here are just guidelines, guidelines you can improve.
Monday, March 12, 2007
Free photography lesson
The following blogs you will see below are photography lessons i made to help the beginners. i have compiled everything that helped me when i was starting years ago. The lessons are very basic and easy to understand (i hope), if you do have questions and want to show your lessons feel free to email me and i will do my best to reply with the most appropriate constructive criticism.
In order to get the best out of the lesson it is best to go about it with someone, so at least you have a friend to shoot with. Also make sure that you do the lessons because it will help you develop your eye for photography and of course keep on shooting so you will know what you want.
In order to get the best out of the lesson it is best to go about it with someone, so at least you have a friend to shoot with. Also make sure that you do the lessons because it will help you develop your eye for photography and of course keep on shooting so you will know what you want.
Photography lesson day 7 - Aperture
Day 7
Aperture. Playing with aperture can create minimum depth of fields or maximum depth of field, Depth of field means the “the depth of area that is sharp in a photo”. It’s the photographer’s creative call to either sharpen the foreground or the background. Minimum depth of field means a specific area is sharp and the rest of the picture is not too sharp. To create a minimum depth of field you must put the aperture to the biggest opening f.2 or f/2.4, by doing this only the image focused by the photographer will appear sharp and the rest is blurred as long as the subject is far from a background. Minimum depth of field is best used for portraits or on emphasizing a subject and then making the rest blurred.
Maximum depth of field makes all the images in the photo appear sharp. To create a maximum depth of field you must put the setting to the smallest opening such as f/16 or f/32. Maximum depth of field is best used for landscapes or documentary photos.
Minimum depth of field:

Maximum depth of field:

Assignment G:
1. Shoot a subject using minimum depth of field
2. Shoot a subject using maximum depth of field
Tips: The aperture and shutter speed play a big role in the exposure of the photography; aside from exposure it also affects the depth of field of the picture. Remember to compensate the settings properly. If you want to blur a subject, set the shutter speed to a slow setting and the set the aperture to the recommended exposure setting or if you want a shallow depth of field for your subject. Set the aperture to the biggest opening or smaller number and put your aperture to the recommended exposure setting
Photography lesson day 6 - Shutter Speed
DAY 6
Playing with Aperture and Shutter
The difference between a good and an amateur photographer is that an amateur photographer points at a subject and then shoots, a good photographers knows how a camera works and how the final image is affected by the adjustment of shutter speed and aperture therefore a good photographer thinks or visualizes what he wants for a final image before shooting.
Shutter Speed. You may use a slow shutter to blur the movement of an object. This means that the reading of slow aperture must be compensated by a small opening aperture or higher f/stop. On the other hand a faster shutter speed will freeze the motion. To do this, set first the shutter speed to desired speed and then get the exposure.
This is an example of blurring the motion. I used slow shutter to show the tracks of the drum sticks

This one on the other hand shows a frozen motion. Notice that everything is sharp.

Assignment F:
1. Shoot a moving subject on a slow shutter
2. Shoot a moving object and stop the motion
Sunday, March 11, 2007
Photography lesson day 5 - Framing
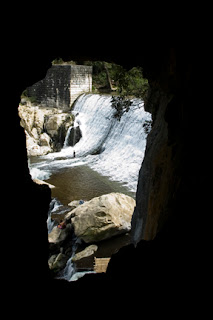
4. Framing simply means frame a picture within a frame. This is something like using an arc of a church door to frame a person. or using a window to frame a subject
In this picture below i used the hole in the cave to frame the water falls
Or you can use a whole area or dominant color to frame your subject

this is an example of using rule of thirds and framing at the same time
Assignment E:
Shoot using framing technique as many as you can
There are other ways to compose a picture. What I mentioned above are just some of the samples. Try experimenting other ways to compose a subject, it is also helpful to look at books or websites on composition. The more you experiment the more you learn.
In this picture below i used the hole in the cave to frame the water falls

Or you can use a whole area or dominant color to frame your subject

this is an example of using rule of thirds and framing at the same time
Assignment E:
Shoot using framing technique as many as you can
There are other ways to compose a picture. What I mentioned above are just some of the samples. Try experimenting other ways to compose a subject, it is also helpful to look at books or websites on composition. The more you experiment the more you learn.
Photography lesson day 4 - Simplify
DAY 4
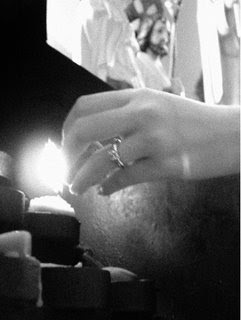
3. Simplify the photo means the photo doesn’t contain elements that distracts the viewers from the subject matter or the only thing sharply focus if the subject. In wide-angle lens try not including bright area the will distract the viewers for the subject or too much action happening behind the subject unless these elements are helpful in making the image stronger.
Notice that the only thing sharp in the picture is the hand and rosary everything else is blurred or another way of doing it is filling the frame with just hand and rosary.

Another way to simplify is to fill your frame with the subject. Notice that the frame is only filled with kids wearing hats.

Assignment D:
Shoot any subject you want using this technique. Make sure to simplify. Shoot as many as you can & explore new ways of simplifying the image
Photography lesson day 3 - Use Lines
DAY 3
2. Use lines. There are several ways to use lines to make a technically good photo. Use lines to lead the eyes of the viewer to the subject.

Using 2 lines to bring the eyes to the river & to the mountain
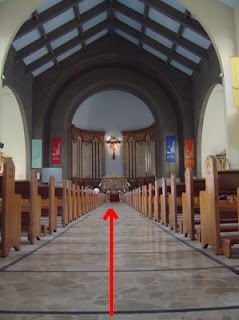
The aisle is like an invisible line it brings your eye towards the altar and the cross. In landscapes you may use C-curves or s-curves shaped rivers to lead the eyes of a viewer, maybe towards a mountain on other subjects.
Assignment C:
Shoot using composition technique of leading lines as many as you can.
Photography lesson day 2 - Composition & Rule of thirds
Composition in photography
Composition plays a big factor in making a photo look good or not. It is best to know some techniques in composition since most of the advance cameras today have very good automatic shooting modes. My point is that almost any one can shoot but it takes the best photographers to compose a good picture. There are no hard and fast rules in making a beautiful picture, only guidelines that helped artists then and now in making good photos.
1. Rule of thirds simply means not putting the subject in the middle of the frame or putting it off center. Why? Because putting the subject in the middle of the frame makes the picture look boring or static.
Most of the time the tendency of an amateur photographer is to put a subject in the middle of the frame this is because people have been used to the idea of focusing an image in the middle of the frame and then shoot, it is best to focus and then compose. By doing this there is more thought given to the image than just clicking away.
The frame is divided in 3 parts.
putting the picture where the lines
intersect makes the picture more
interesting.

Assignment B:
Shoot as many as you can use rule of thirds as composition technique.
Photography lesson Day 1 - Introduction
Day 1
So you want to be a photographer?
There are different levels of photography, on the leisure class there would be the clicker who would shoot occasionally or when he wants to. There are the serious hobbyists who would go around spending for gadgets and travel just to satisfy their need to capture images. There are the intellectual photographers who are the knowledge eaters, they read and read and read but do not shoot, ask them anything and you get an instant answer. There are the professional photographers who earn their living getting paid to take pictures. They can be wedding photographers, photojournalists or commercial photographers. And there is the artist photographer who just shoots what he likes to shoot for the sake of art. Any of these I mentioned can be you so before even thinking of advancing your way to being called a PHOTOGRAPHER you first need to know the kind of photography you want to do.
In order to know what you want you need to determine your goal, ask yourself “why do I want to learn”? maybe because you want to be a professional photographer or just make it a hobby or just to know. After answering the question ask yourself “What is my interest or what it is that interests me?” is it shooting landscapes? People? Candid moments? Sports? Cars? To know the branch of photography you are interested in it is best to check out newspapers, books and magazines to know the kind of photography that strikes you. A portrait maybe or an advertisement or documentary photo. Only by knowing these things will make you appreciate photography because you know what you want and if you get what you want, then you know you have a new knowledge.
Assignment A:
1. Write down the reasons why you want to learn photography, where are you going to use your knowledge? What kind photographer you want to be, a professional if yes what kind of practice, if no, what is the extent of your hobby? The answers here are important it will tell if you want to be a professional or just a hobbyist
2. get a photo you personally took and write down the reasons why you like it. Take hold of it because you will compare it to you pictures after finishing all the assignments.
3. Get a photo you did not take, something that caught your attention, it maybe from a magazine, newspaper or Internet, anywhere as long as you did not take it and then write down the reasons why you like it. The reason will determine the style you want for your shooting
Practical photography
This is a lesson that will help readers jump-start their way into taking pictures. I made everything easy to read and understand, no camera jargons or technical hullabaloos. I didn’t put a lot of information because I want readers have the freedom of trying and experimenting, by doing so students and readersbecome more creative in their approach to photography.
The main goal of this reading is to elevate the skill of a photographer with the introduction of technical terms and technical skills in photography. And at the same time developing the creativity of the photographer by doing exercises suggested in this manual
These are just the basics and the important foundations for an inspiring photographer. Much of the photographer’s knowledge is gained through shooting and experience. I learned mine through shooting, and shooting a lot of films. To those who want to learn photography it doesn’t just take a click of the camera’s shutter to capture a subject. A subject needs to be treated with a lot of thought and careful study on how to make it appealing as a photograph. Remember that a photograph is never accompanied by words so the message of the photograph has to be clear, if the message is happy baby just make sure that the body language of the baby is happy by showing a smile or laughter.
Learn and enjoy through this simple practical photography guidelines.
Basic Vocabulary:
Camera is a tool used to capture an image to make a photograph.
Lens is a part of the camera where light passes through.
Photograph is an image captured on Film or imaging sensor
Film is where the image is recorded.
Imaging sensor is the “film” of the digital camera.
Film Sensitivity is the measure of film’s sensitivity to light. It is measure in ISO 100, 200, 400, 800 and 1600. Lower the number requires longer exposure, the higher the number the more sensitive to light thus requiring less light to capture the image. Practically, if you don’t have a tripod use a higher sensitivity on low light situation because this will not require longer exposure but quality may suffer because of noise or grain on the photo.
(A noise or grain is like little dust particle on the all over photo.)
Sample of a grainy or noisy photo, the picture looks rough.
Aperture* is the hole or iris in the lens where light passes through. This means that the bigger the hole the more light is allowed to reach the film or digital sensor (for digital camera). The symbol is f, and the following are the openings f/16, f/11, f/8, f/5.6, f/4, f/2.8, f/2, f/1.4. to open up one stop means turning the aperture from f/16 to f/11 (if your setting is on f/16), to open up two stop (if the setting is on f/16) means turning the setting from f/16 to f/8. Remember that the lower the number the bigger the opening of the aperture therefore allowing more light to pass through the hole and the higher the number the less light that comes in
Shutter speed* is the time for which the shutter curtain is held open during the taking of an image to allow light to reach the film or imaging sensor. The longer the shutter is open the more light captured on film. Common shutter speeds are from fast to slow: 1/2000, 1/1000, 1/500, 1/250, 1/125, 1/60, 1/30, 1/15, 1/8, 1/4, 1/2 of a second and 1 second. The symbol B on the shutter speed dial means manually leaving the shutter open until the photographer closes it. Leaving the shutter on setting like 1/2 of a second means more light is recorded on film.
*Check your camera manual on how to or where to adjust
Things to know about your camera Digital or Film
Exposure modes:
1. Manual. This setting will allow you to manipulate the shutter speed and aperture setting giving you more creativity to your image
2. Aperture Priority. This setting allows you to manipulate on the aperture setting making your shutter speed to automatically set its own exposure. You normally use this when you want a shallow or great depth of field (Depth of field or DOF is explained on later lessons)
3. Shutter Priority. This allows you to assign a shutter of your choice and the aperture automatically sets itself as you shoot. You normally use this if you want to have an effect of blurring or freezing motion which I shall explain on later lessons
4. Program mode. This mode allows you to just point and shoot. The camera take care of everything.
ISO setting
This is considered to be the film speed (check on film speed/film sensitivity)
Picture Quality
This is the file size of the photo you are to capture
White Balance
There are several settings for the white balance such as daylight balance, tungsten, auto, custom (custom balance allows you to manually set your color white by taking a photograph of any white surface you point the camera to.) Set the white balance in accordance to your lighting condition to make sure that white appears as white and does not cast any color on the photo.
Different types of metering modes
1.Matrix metering or evaluative (name depends on the manufacturer.) This meter mode will get the average light of the whole frame.
2. Center weighted metering. This meters the subject closer to the center of the frame.
3. Spot metering. Meters a very specific spot and you need to override the meter reading if the surface is not middle grey
Photography means painting with light. Now, in order for you to produce a photograph you need light, light to bounce off from an image, pass through the lens and that light that bounced off from the image is also the light that is captured on the film or a digital sensor.
Exposure means to expose the film on light to allow the capture of image. Expose it more than the recommended setting then the picture gets over exposed, as a result the image is too bright. Expose the film under the recommended setting means the pictures get under exposed or the picture gets dim. Question! How do you know the proper exposure? ( Notice I used proper exposure and not correct exposure because there is no correct exposure in photography. Some photos are nicer when it is a bit dark or a bit bright. The final call is with the photographer. The light meter is just a guideline to ensure the photo taken is neither too dark nor too light.) Most cameras today comes with built in exposure meters, if it doesn’t then you need a light meter or spot meter to check the right amount of exposure. Next question! How do you read exposure? First and foremost you have to understand how a camera meters work. Camera meters are stupid they don’t see colors only the reflection of light; they only see dark, middle grey, and bright light. Remember this, Black does absorb light so if you point a meter or the camera on a dark surface the meter thinks that the camera needs to expose the film longer therefore if you shoot using the setting given by the meter the result would be an overexposed picture, so you have to override the meter by closing 1 or 2 stops either the aperture or shutter speed. On the other hand, if you meter a white surface or bright surface the meter will think that it is capturing a very bright surface because white bounces off light so if you use the setting recommended by the light meter the result will be an underexposed photo so again, override your meter by opening 1 or 2 stops, either the aperture or shutter speed. Metering a middle grey surface will be the right way to do it. Its either you buy a middle grey card or if you don’t get one, meter a white surface and just adjust the aperture or shutter by 1 stop to 2 stops over exposed. If there is no white surface try it on dark surface just open up by 1 or 2 stops.
Nowadays everything is easier because of the digital camera but what if there is a need to use a film camera. It is still best to know the basics of photography rather than relying on technology.
Taking a picture
In order to capture an image you need to remember a few things before clicking the shutter.
1. Be sure to set the proper exposure or to put it in any exposure mode (manual, shutter priority, aperture priority or program) you desire
2. Hold the camera properly to secure from any camera shake
3. Focus on the subject. (If you are taking a picture of a human subject be sure to focus on the eye) Make sure that focus is correct to make the subject sharp.
4. Compose the Picture using some rules in composition (rules will be discussed in the following lessons).
So you want to be a photographer?
There are different levels of photography, on the leisure class there would be the clicker who would shoot occasionally or when he wants to. There are the serious hobbyists who would go around spending for gadgets and travel just to satisfy their need to capture images. There are the intellectual photographers who are the knowledge eaters, they read and read and read but do not shoot, ask them anything and you get an instant answer. There are the professional photographers who earn their living getting paid to take pictures. They can be wedding photographers, photojournalists or commercial photographers. And there is the artist photographer who just shoots what he likes to shoot for the sake of art. Any of these I mentioned can be you so before even thinking of advancing your way to being called a PHOTOGRAPHER you first need to know the kind of photography you want to do.
In order to know what you want you need to determine your goal, ask yourself “why do I want to learn”? maybe because you want to be a professional photographer or just make it a hobby or just to know. After answering the question ask yourself “What is my interest or what it is that interests me?” is it shooting landscapes? People? Candid moments? Sports? Cars? To know the branch of photography you are interested in it is best to check out newspapers, books and magazines to know the kind of photography that strikes you. A portrait maybe or an advertisement or documentary photo. Only by knowing these things will make you appreciate photography because you know what you want and if you get what you want, then you know you have a new knowledge.
Assignment A:
1. Write down the reasons why you want to learn photography, where are you going to use your knowledge? What kind photographer you want to be, a professional if yes what kind of practice, if no, what is the extent of your hobby? The answers here are important it will tell if you want to be a professional or just a hobbyist
2. get a photo you personally took and write down the reasons why you like it. Take hold of it because you will compare it to you pictures after finishing all the assignments.
3. Get a photo you did not take, something that caught your attention, it maybe from a magazine, newspaper or Internet, anywhere as long as you did not take it and then write down the reasons why you like it. The reason will determine the style you want for your shooting
Practical photography
This is a lesson that will help readers jump-start their way into taking pictures. I made everything easy to read and understand, no camera jargons or technical hullabaloos. I didn’t put a lot of information because I want readers have the freedom of trying and experimenting, by doing so students and readersbecome more creative in their approach to photography.
The main goal of this reading is to elevate the skill of a photographer with the introduction of technical terms and technical skills in photography. And at the same time developing the creativity of the photographer by doing exercises suggested in this manual
These are just the basics and the important foundations for an inspiring photographer. Much of the photographer’s knowledge is gained through shooting and experience. I learned mine through shooting, and shooting a lot of films. To those who want to learn photography it doesn’t just take a click of the camera’s shutter to capture a subject. A subject needs to be treated with a lot of thought and careful study on how to make it appealing as a photograph. Remember that a photograph is never accompanied by words so the message of the photograph has to be clear, if the message is happy baby just make sure that the body language of the baby is happy by showing a smile or laughter.
Learn and enjoy through this simple practical photography guidelines.
Basic Vocabulary:
Camera is a tool used to capture an image to make a photograph.
Lens is a part of the camera where light passes through.
Photograph is an image captured on Film or imaging sensor
Film is where the image is recorded.
Imaging sensor is the “film” of the digital camera.
Film Sensitivity is the measure of film’s sensitivity to light. It is measure in ISO 100, 200, 400, 800 and 1600. Lower the number requires longer exposure, the higher the number the more sensitive to light thus requiring less light to capture the image. Practically, if you don’t have a tripod use a higher sensitivity on low light situation because this will not require longer exposure but quality may suffer because of noise or grain on the photo.
(A noise or grain is like little dust particle on the all over photo.)
Sample of a grainy or noisy photo, the picture looks rough.

Aperture* is the hole or iris in the lens where light passes through. This means that the bigger the hole the more light is allowed to reach the film or digital sensor (for digital camera). The symbol is f, and the following are the openings f/16, f/11, f/8, f/5.6, f/4, f/2.8, f/2, f/1.4. to open up one stop means turning the aperture from f/16 to f/11 (if your setting is on f/16), to open up two stop (if the setting is on f/16) means turning the setting from f/16 to f/8. Remember that the lower the number the bigger the opening of the aperture therefore allowing more light to pass through the hole and the higher the number the less light that comes in
Shutter speed* is the time for which the shutter curtain is held open during the taking of an image to allow light to reach the film or imaging sensor. The longer the shutter is open the more light captured on film. Common shutter speeds are from fast to slow: 1/2000, 1/1000, 1/500, 1/250, 1/125, 1/60, 1/30, 1/15, 1/8, 1/4, 1/2 of a second and 1 second. The symbol B on the shutter speed dial means manually leaving the shutter open until the photographer closes it. Leaving the shutter on setting like 1/2 of a second means more light is recorded on film.
*Check your camera manual on how to or where to adjust
Things to know about your camera Digital or Film
Exposure modes:
1. Manual. This setting will allow you to manipulate the shutter speed and aperture setting giving you more creativity to your image
2. Aperture Priority. This setting allows you to manipulate on the aperture setting making your shutter speed to automatically set its own exposure. You normally use this when you want a shallow or great depth of field (Depth of field or DOF is explained on later lessons)
3. Shutter Priority. This allows you to assign a shutter of your choice and the aperture automatically sets itself as you shoot. You normally use this if you want to have an effect of blurring or freezing motion which I shall explain on later lessons
4. Program mode. This mode allows you to just point and shoot. The camera take care of everything.
ISO setting
This is considered to be the film speed (check on film speed/film sensitivity)
Picture Quality
This is the file size of the photo you are to capture
White Balance
There are several settings for the white balance such as daylight balance, tungsten, auto, custom (custom balance allows you to manually set your color white by taking a photograph of any white surface you point the camera to.) Set the white balance in accordance to your lighting condition to make sure that white appears as white and does not cast any color on the photo.
Different types of metering modes
1.Matrix metering or evaluative (name depends on the manufacturer.) This meter mode will get the average light of the whole frame.
2. Center weighted metering. This meters the subject closer to the center of the frame.
3. Spot metering. Meters a very specific spot and you need to override the meter reading if the surface is not middle grey
Photography means painting with light. Now, in order for you to produce a photograph you need light, light to bounce off from an image, pass through the lens and that light that bounced off from the image is also the light that is captured on the film or a digital sensor.
Exposure means to expose the film on light to allow the capture of image. Expose it more than the recommended setting then the picture gets over exposed, as a result the image is too bright. Expose the film under the recommended setting means the pictures get under exposed or the picture gets dim. Question! How do you know the proper exposure? ( Notice I used proper exposure and not correct exposure because there is no correct exposure in photography. Some photos are nicer when it is a bit dark or a bit bright. The final call is with the photographer. The light meter is just a guideline to ensure the photo taken is neither too dark nor too light.) Most cameras today comes with built in exposure meters, if it doesn’t then you need a light meter or spot meter to check the right amount of exposure. Next question! How do you read exposure? First and foremost you have to understand how a camera meters work. Camera meters are stupid they don’t see colors only the reflection of light; they only see dark, middle grey, and bright light. Remember this, Black does absorb light so if you point a meter or the camera on a dark surface the meter thinks that the camera needs to expose the film longer therefore if you shoot using the setting given by the meter the result would be an overexposed picture, so you have to override the meter by closing 1 or 2 stops either the aperture or shutter speed. On the other hand, if you meter a white surface or bright surface the meter will think that it is capturing a very bright surface because white bounces off light so if you use the setting recommended by the light meter the result will be an underexposed photo so again, override your meter by opening 1 or 2 stops, either the aperture or shutter speed. Metering a middle grey surface will be the right way to do it. Its either you buy a middle grey card or if you don’t get one, meter a white surface and just adjust the aperture or shutter by 1 stop to 2 stops over exposed. If there is no white surface try it on dark surface just open up by 1 or 2 stops.
Nowadays everything is easier because of the digital camera but what if there is a need to use a film camera. It is still best to know the basics of photography rather than relying on technology.
Taking a picture
In order to capture an image you need to remember a few things before clicking the shutter.
1. Be sure to set the proper exposure or to put it in any exposure mode (manual, shutter priority, aperture priority or program) you desire
2. Hold the camera properly to secure from any camera shake
3. Focus on the subject. (If you are taking a picture of a human subject be sure to focus on the eye) Make sure that focus is correct to make the subject sharp.
4. Compose the Picture using some rules in composition (rules will be discussed in the following lessons).
Man behind Funky mutated jeprox
I am Jeff Cua, a husband, a father, entrepeneur, commercial photographer & art photographer. I love art and anything around it, stuff like music, drawings, paintings, movies, photography, etc... You wont see anything about my personal life here, what you will see are my how to's about art photography and stuff that will get you going. This website is interactive, you can ask questions by sending me emails, you can also show me your pictures and I will do some brain stretching to give the most constructive opinion (of course, only if you ask for it).
I am a member of Camera Club of the Philippines, the oldest Club in Asia.I have done lectures on creative photography and i currently teach "Foundations of Creative Photography" in Informatics Computer Institute. I am also a freelance photographer doing works for Victory Liner, Chatteau 1771, Informatics, etc... I have participated group exhibits, I did 3 exhibits last 2006 and 1 last 2005 that featured my winning Photo I entered in San Miguel Photo Contest. I am currently planning on my first one man exhibit featuring my abstract photography. here are some samples to share:


I am a member of Camera Club of the Philippines, the oldest Club in Asia.I have done lectures on creative photography and i currently teach "Foundations of Creative Photography" in Informatics Computer Institute. I am also a freelance photographer doing works for Victory Liner, Chatteau 1771, Informatics, etc... I have participated group exhibits, I did 3 exhibits last 2006 and 1 last 2005 that featured my winning Photo I entered in San Miguel Photo Contest. I am currently planning on my first one man exhibit featuring my abstract photography. here are some samples to share:


Subscribe to:
Posts (Atom)